Severity: Notice
Message: Only variable references should be returned by reference
Filename: core/Common.php
Line Number: 257
Severity: Warning
Message: Cannot modify header information - headers already sent by (output started at /home1/murguz/public_html/system/core/Exceptions.php:185)
Filename: libraries/Session.php
Line Number: 688
How to skin Feathers (Starling Extension) Button component?
Hello Internet, this time I am writing tutorial on Game Development. Particularly about Startling’s Feathers extension. Let’s start with introducing Starling for those of you who are not familiar with this cool framework. Starling is a cross platform game engine, written in AS3 that enables to make games that run on GPU. You can make games that run on browsers (flash player) as well as on mobile devices (Air runtime). The Feathers is an extension that helps to develop user interfaces for Starling applications. It has really cool looking themes, but here I will explain how to skin feather component extending one of its themes.
To complete this tutorial you will need Flash Builder (4.6.0 or newer) or any other software that compiles ActionScript projects. I have read about Flash Develop (free and open source), but haven’t used myself. You will need to update Air SDK to be able to compile files without an error. You can download finished source files.
So let’s get started. First create new ActionScript project by clicking File->New->ActionScript Mobile project from the top menu.
Popup will be open. Name your project and select Flex SDK (4.6.0 or newer). I will name project “FeathersButtonSkin”. Select mobile platform you want to target. Click finish to create a project. Right click newly created project in package explorer and create new folder “libs” by clicking New->Folder from context menu.
Then go to Gamua’s website and download latest Starling download package. For this tutorial I am using version 1.5.1. Copy 2 folders (“com” and “starling”) from “Starling-Framework-master\starling\src” folder to “libs” folder in the project explorer.
We will also need Feathers extension, so let’s download it. At the time this tutorial is written latest version is 1.3.1. Extract zip file and locate folder “feathers-1.3.1\source”. Copy “feathers” folder into the “libs”. Now we have all source files, go to Library Path by clicking Properties from right click context menu in the package explorer. In the Source Path tab Click “Add Folder” and select libs folder. This will add libs folder to the Build Path.

Then open “FeathersButtonSkin-app.xml” file and set render mode to “direct”.
...
<renderMode>direct</renderMode>
...
Next we will need to add one of Feathers themes to our project. Again go to “feathers-1.3.1\themes\MetalWorksMobileTheme\source\” and copy “feathers” folder to “libs” folder. Finally we should have 3 folders inside libs folder: “com”, ”starling”, ”feathers”. Lastly we will need to copy “assets” folder in the “feathers-1.3.1\themes\MetalWorksMobileTheme\” to project. As you should have guessed we will extend Metal Works Mobile Theme to skin our button.
Now we are ready to begin actual programming. We will place button with default theme, then will extend theme to make a custom skin. Replace code inside “FeathersButtonSkin” with the following:
package
{
	import com.murguz.Main;

	import flash.display.Sprite;
	import flash.events.Event;

	import starling.core.Starling;

	[SWF(frameRate=60, backgroundColor = 0x333333)]
	public class FeathersButtonSkin extends Sprite
	{
		public function FeathersButtonSkin()
		{
			loaderInfo.addEventListener(Event.COMPLETE, onLoadComplete);
		}

		protected function onLoadComplete(event:Event):void
		{
			var star:Starling = new Starling(Main, stage);
			star.showStats = true;
			star.start();
		}
	}
}
In the code above we have added SWF properties, frame rate to 60 frames per second and background color to dark gray. Inside constructor function we have added listener for loading complete event. And inside onLoadComplete function we are creating new Starling instance and setting show statistics property to true. Next we are going to create new class “Main” as a root class for starling.
package com.murguz
{
	import feathers.controls.Button;
	import feathers.themes.MetalWorksMobileTheme;

	import starling.display.Sprite;
	import starling.events.Event;

	public class Main extends Sprite
	{

		public function Main()
		{
			this.addEventListener(Event.ADDED_TO_STAGE, onStageReady);
		}

		private function onStageReady():void
		{
			new MetalWorksMobileTheme();

			var btn:Button = new Button();
			btn.label = "Default Button";
			btn.width = 200;
			btn.y = 40;
			btn.x = 140;
			addChild(btn);
		}
	}
}
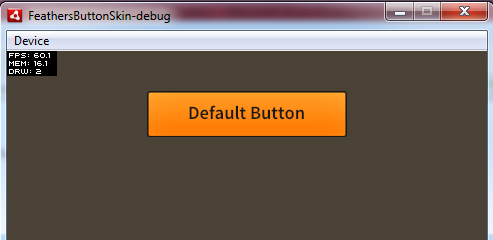
On the constructor function we wait for ADDED_TO_STAGE event. Inside stage function we are setting MetalWorksMobileTheme as a default theme. Then we add Feathers button to test if we have all working. When you click run or debug you should have following on screen:
I think it looks cool . However I am going to show you how you can make your theme by extending default one. We are going to use font “Changa One” , you can download it yourself from Google Fonts ,although I have included it in source files. Also I have made up and down textures in photoshop , each having 60pixel width and 60px height. Ok , let’s create our custom theme:
package com.murguz
{
	import feathers.controls.Button;
	import feathers.skins.SmartDisplayObjectStateValueSelector;
	import feathers.textures.Scale9Textures;
	import feathers.themes.MetalWorksMobileTheme;

	import flash.geom.Rectangle;
	import flash.text.engine.CFFHinting;
	import flash.text.engine.ElementFormat;
	import flash.text.engine.FontDescription;
	import flash.text.engine.FontLookup;
	import flash.text.engine.FontPosture;
	import flash.text.engine.FontWeight;
	import flash.text.engine.RenderingMode;

	import starling.display.DisplayObjectContainer;
	import starling.textures.Texture;

	public class CustomMetalWorksTheme extends MetalWorksMobileTheme
	{
		public static const CUSTOM_BUTTON:String = "my-custom-button";

		[Embed(source="assets/murguz/ChangaOne-Regular.ttf", embedAsCFF="true", fontFamily="Changa One", fontName="Changa One")]
		public static const CHANGE_ONE:Class;

		[Embed(source="assets/murguz/button_up.png")]
		private static var buttonUp:Class;
		public static var buttonUpTexture:Texture;

		[Embed(source="assets/murguz/button_down.png")]
		private static var buttonDown:Class;
		public static var buttonDownTexture:Texture;

		public function CustomMetalWorksTheme(container:DisplayObjectContainer=null, scaleToDPI:Boolean=true)
		{
			super(container, scaleToDPI);
		}

		override protected function initialize():void
		{
			super.initialize();

			// set new initializers here
			this.setInitializerForClass( Button, mySimpleButtonInitializer, CUSTOM_BUTTON );
		}

		protected function mySimpleButtonInitializer(button:Button):void
		{
			// Setting Background Texture
			buttonUpTexture = Texture.fromBitmap(new buttonUp());
			buttonDownTexture = Texture.fromBitmap(new buttonDown());
			var rect:Rectangle = new Rectangle(5, 5, 50, 50);
			var default_texture:Scale9Textures = new Scale9Textures( buttonUpTexture, rect );
			var down_texture:Scale9Textures = new Scale9Textures( buttonDownTexture, rect );

			var skinSelector:SmartDisplayObjectStateValueSelector = new SmartDisplayObjectStateValueSelector();
			skinSelector.defaultValue = default_texture;
			skinSelector.setValueForState(down_texture, Button.STATE_DOWN, false);
			skinSelector.setValueForState(this.buttonDisabledSkinTextures, Button.STATE_DISABLED, false);
			skinSelector.displayObjectProperties =
				{
					width: 60 * this.scale,
						height: 60 * this.scale,
						textureScale: this.scale
				};
			button.stateToSkinFunction = skinSelector.updateValue;
			button.minWidth = button.minHeight = 60 * this.scale;
			button.minTouchWidth = button.minTouchHeight = 88 * this.scale;

			// Setting Font Details
			this.regularFontDescription = new FontDescription("Changa One", FontWeight.NORMAL, FontPosture.NORMAL, FontLookup.EMBEDDED_CFF, RenderingMode.NORMAL, CFFHinting.HORIZONTAL_STEM);

			button.defaultLabelProperties.elementFormat  = new ElementFormat(this.regularFontDescription, 25 * this.scale, LIGHT_TEXT_COLOR);
			button.defaultLabelProperties.embedFonts = true;

			button.downLabelProperties.elementFormat  = new ElementFormat(this.regularFontDescription, 25 * this.scale, LIGHT_TEXT_COLOR);
			button.downLabelProperties.embedFonts = true;
			button.defaultSelectedLabelProperties.elementFormat  = new ElementFormat(this.regularFontDescription, 25 * this.scale, LIGHT_TEXT_COLOR);
			button.defaultSelectedLabelProperties.embedFonts = true;
		}
	}
}
Let me explain line by line what this code is doing.
Line 3-18: We are importing all classes needed. We can group them as 3 categories “feathers” classes, “flash” classes and “starling” classes.
Line 22-33: Here we embed font file and 2 images for up and down state, as well as two texture variables that we are going to initialize later in the code. Also we are setting CUSTOM_BUTTON as static constant to make it easier to call from other classes.
Line 40-46: Inside initialize function first we call initialize of super class. Then we add initializer for buttons that has CUSTOM_BUTTON in the name list.
Line 50-55: First we make textures from bitmap files using Texture.fromBitmap function. Then we define Rectangle of size 50x50 pixel and 5 pixel padding that rectangle to create Scale9Texture. It will slice our image to 9 pieces ( top: 5x5 , 5x50, 5x5 , middle: 5x50 ,50x50,5x50 , bottom: 5x5 , 5x50, 5x5 ). Original bitmaps is 60x60pixels.
Line 57-69: Here we set values to background skin. Take attention to this.scale properties, that will be calculated based on device DPI to make possible scale button for each device. Also we set minTouchWidth and minTouchHeight to 88pixels multiplied by scale factor which is bigger than button width.
Line 72-80: Lastly here we style text properties for 3 states : default , down and selected. We use font description where we set all fonts to “Changa One” , sizes to 25 pixel multiplied by scale and text colors to white (0xffffff).
Lastly we will need to make necessary changes to “Main” class as following:
package com.murguz
{
	import feathers.controls.Button;
	import feathers.themes.MetalWorksMobileTheme;

	import starling.display.Sprite;
	import starling.events.Event;

	public class Main extends Sprite
	{

		public function Main()
		{
			this.addEventListener(Event.ADDED_TO_STAGE, onStageReady);
		}

		private function onStageReady():void
		{
			new CustomMetalWorksTheme();

			var btn:Button = new Button();
			btn.label = "Default Button";
			btn.width = 200;
			btn.y = 40;
			btn.x = 140;
			addChild(btn);

			var btn2:Button = new Button();
			btn2.nameList.add( CustomMetalWorksTheme.CUSTOM_BUTTON );
			btn2.label = "Custom Button";
			btn2.width = 200;
			btn2.y = 100;
			btn2.x = 140;
			addChild(btn2);
		}
	}
}
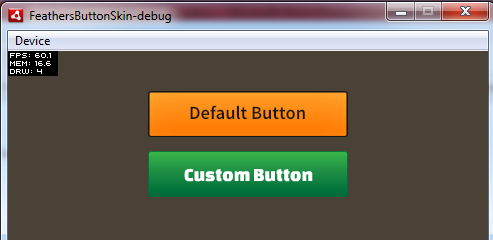
In the code above we change theme to CustomMetalWorksTheme, add one more button to display list and add CUSTOM_BUTTON property to its name list. As a result we have:
You can download source files. That’s all for now, please let us know what do you think. More stuff coming soon.
July 23,2014
Admin
Category: Game Development
Rate: